Brick Pointing Guide: Restore Masonry and Extend the Life of Your Walls
Brick pointing is the craft of removing damaged mortar from joints and replacing it with new mortar to protect masonry and restore the look of brickwork. Proper pointing prevents water ingress which can cause structural damage and costly repairs. Whether you are a homeowner tackling maintenance or a tradesperson refining a skill this guide covers what brick pointing is why it matters and how to carry out quality work.
What Is Brick Pointing and Why It Matters
Brick pointing is the process of renewing the mortar joints between bricks. Over time mortar erodes because of weather action freeze and thaw cycles and general wear. Once joints are degraded moisture can penetrate behind the facing bricks leading to frost damage internal damp and deterioration of the structure. Repointing restores a weather tight joint improves thermal performance and renews the visual appeal of the wall.
Beyond appearance the right mortar mix and correct technique are essential. Hard or incompatible mortar can cause bricks to crack. Too soft a mix will erode quickly. Correct pointing extends the lifespan of the masonry and reduces the need for major repair later.
Signs You Need Repointing
Check your brickwork regularly. Common signs that brick pointing is needed include loose or crumbling mortar visible gaps between bricks and increased damp inside buildings near external walls. If mortar powder comes away when you run your finger along a joint or if mortar has fallen out in sections it is time to plan repointing. Small areas can be managed with DIY work while larger areas or structural issues require a professional assessment.
Types of Mortar for Pointing
Selecting the correct mortar is vital. Traditional lime mortar is softer and more flexible than cement based mortar and is often preferred on older buildings that were built with lime. Modern cement mortars are harder and set faster but they can trap moisture in softer historic bricks. For new brickwork or where compatibility is not an issue a cement rich mortar is commonly used. A blended mortar can combine the advantages of both. When in doubt match the original mortar strength and colour to ensure sympathetic repair.
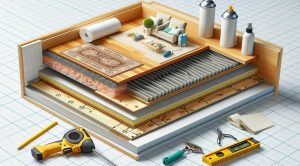
Tools and Materials You Will Need
Common tools and materials for brick pointing include a mortar mix suitable for your brick type a pointing trowel or pointing iron a joint raker or grinder for removing old mortar a brush to clear dust and a pointing tool to compact and shape the new mortar. You will also need safety equipment such as gloves eye protection and a dust mask. Choose mortar colours or pigments if you want to match the existing appearance of the joints.
Step by Step Guide to Brick Pointing
Follow these step by step instructions for small to medium projects. For large scale work consult a professional.
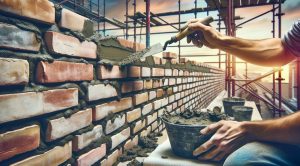
1. Inspect the wall and mark areas that need attention. Work out whether bricks need replacing as well. 2. Remove the defective mortar to a uniform depth using a joint raker or an angle grinder fitted with a suitable disc. Take care not to damage the brick edges. 3. Clear out all dust and debris from the joints with a brush and then dampen the bricks slightly to prevent rapid drying. 4. Mix the mortar to the correct consistency. It should be workable but not sloppy. 5. Apply the mortar in layers pressing it firmly into the joint with a pointing trowel or a pointing gun. Compacting the mortar prevents shrinkage and voids. 6. Tool the joint to the required finish once the mortar has stiffened. A concave joint is often best because it sheds water well. 7. Brush off any excess mortar and keep the newly pointed area damp for a few days to allow proper curing.
Take your time to match the texture and finish of the existing joints for a consistent appearance. Practice on a sample section if you are new to pointing to develop the right technique.
Safety and Best Practices
Remove mortar carefully to avoid damage to the bricks. Use protective equipment to guard against dust and flying particles. When using power tools control the dust by vacuum extraction and use respirators where necessary. Work in dry weather and avoid very hot or freezing conditions as both extremes can affect mortar performance. Keep new mortar moist while curing to reduce the risk of cracking and poor bond.
Common Mistakes to Avoid
Avoid using a mortar that is significantly harder than the original. Hard cement rich mortars can force moisture into bricks causing spalling and long term damage. Do not overfill joints or leave mortar proud of the brick face. Excess mortar that is not removed can stain the brick surface. Do not rush removal of the old mortar as incomplete cleaning leads to weak bond of new mortar. Finally do not ignore the cause of deterioration. Solve drainage or guttering issues and rectify rising damp before carrying out large scale repointing.
When to Hire a Professional
Large areas of decay complex detailing listed buildings and structural concerns call for an experienced mason. Professionals will provide an assessment of underlying causes choose compatible materials and deliver a finish that respects the original craftsmanship. If the wall has movement cracks or if the pointing has failed repeatedly professional diagnosis can prevent repeated work and additional expense.
Estimated Costs and Time
Costs vary with the scale of work the type of mortar and access issues. DIY for small patches can be cost effective but labour is intensive for full walls. Professionals will quote by square metre and will include preparation scaffolding and disposal costs. Factor in time for removal curing and final finish. If you plan to maintain your property regularly repointing cost can be spread over years reducing the need for major restoration.
Maintenance After Pointing
Once joint work is complete check gutters down pipes and roof details to prevent water from running down walls. Inspect the pointing periodically and carry out minor repairs early. Keep vegetation away from walls as roots and climbing plants can lift mortar and hold moisture against the brickwork. Good maintenance extends the life of the pointing and reduces long term expenditure.
Further Resources and Where to Learn More
For a hub of repair guides and practical tips on a wide range of home fixing tasks visit fixolix.com where you will find step by step instruction and safety advice on masonry and related trades. If you are researching the impact of surface wear on sports infrastructure and outdoor brickwork consider a resource that covers venue upkeep and related topics at SportSoulPulse.com.
Conclusion
Brick pointing is a vital maintenance task that protects masonry from moisture ingress restores aesthetics and prolongs the life of walls. With the right mortar careful preparation and correct tooling you can complete effective repairs yourself on small areas. For larger complex or historic work engage a qualified mason to ensure compatibility and long lasting results. Regular inspection and proactive maintenance are the keys to keeping brickwork in good condition for many years.